
In a Victorian terrace in Manchester, you might use a slim slatted divider to separate the kitchen-diner from the snug without losing daylight. You’ll start by deciding what it needs to do—screen clutter, guide circulation, or add a bit of architectural rhythm—then you’ll match timber, slat width, and spacing to the look you’re after. Measure floor-to-ceiling at several points, because nothing’s truly level, and you’ll see why that changes everything…
Key Takeaways
- Define the divider’s purpose and position, mapping sightlines and walkways to maintain flow in the open-plan space.
- Measure floor-to-ceiling height at multiple points, record in millimeters, and cut slats to the smallest measurement for consistency.
- Choose stable, straight-grained timber and modern proportions: 30–45mm slat width, 18–25mm thickness, and 10–20mm spacing.
- Build and dry-fit a square top/bottom rail frame, mark layout with a story stick, and pre-drill/countersink to prevent splitting.
- Anchor securely into joists, masonry, or concrete (not plasterboard alone), then sand 120–240 grit and finish with oil or matte lacquer.
Plan Your Slatted Wood Divider (Purpose + Placement)

Before you buy timber or sketch a single slat, decide exactly what your divider needs to do and where it’ll sit in your open-plan layout. Are you zoning a WFH nook off the living area, soft-screening the dining table, or hiding a busy hallway sightline?
Map key viewpoints from the sofa, kitchen island, and main entry, then set a target for privacy concerns: full visual break, partial screening, or just gentle separation.
Mark door swings, radiator positions, sockets, and any underfloor heating routes before you commit. Check ceiling height, skirting profiles, and whether you’ll fix to joists or a concrete slab.
Finally, balance aesthetic considerations with flow, keeping walkways clear and sightlines intentionally framed, not blocked.
Choose Wood, Slat Size, and Spacing
Once you’ve nailed the divider’s job and location, you can spec the timber and proportions that make it feel properly “built-in” rather than bolt-on. Pick a stable, straight-grained species: oak for warmth, ash for a pale Scandi look, walnut for boutique drama, or moisture‑tolerant iroko near kitchens. Check boards for consistent wood grain so the run reads intentional, not patchy.
Size slats to suit the room: 30–45mm wide feels contemporary; 60mm goes more architectural. Keep thickness around 18–25mm so it doesn’t look flimsy. For spacing, 10–20mm gaps give privacy without blocking light; widen to 25mm for airier zoning.
Match finish options to your scheme: matt oil for texture, satin lacquer for wipe‑clean living.
Gather Materials, Tools, and Anchoring Hardware
Next, you’ll gather the essential timber and supplies—planed slats, top and bottom rails, wood glue, filler, sandpaper, and your chosen finish—so everything matches that clean, modern look.
You’ll also pick anchoring hardware to suit your wall and floor build-up, whether that’s masonry plugs for brick, heavy-duty plasterboard fixings, or concrete anchors for a slab.
Finish your list with the right fasteners and brackets—countersunk screws, angle brackets, and discreet fixing plates—so the divider stays rigid and neatly aligned.
Essential Lumber And Supplies
Whether you’re building a full-height feature divider or a waist-high zoning screen, you’ll get a cleaner finish (and far fewer last-minute trips to B&Q) by sorting your timber, fixings, and tools upfront.
For a crisp, contemporary look, pick planed PAR softwood for budget builds, or oak/ash if your Design inspiration leans Scandi or Japandi. Check boards are straight, knot-light, and from a consistent batch so your shadow gaps stay even. Prioritise material durability by choosing kiln-dried timber (lower movement) and allowing it to acclimatise indoors for 48 hours.
Add wood glue, sandpaper (120/180/240 grit), stain or hardwax oil, primer/paint if you’re going tonal, plus filler for pin holes.
Bring a mitre saw, sander, drill/driver, level, and spacers. Don’t forget dust sheets and ear defenders.
Anchors, Fasteners, And Brackets
Where you fix your slatted divider matters just as much as how you build it, so match your anchors and brackets to the structure before you buy. In UK homes, you’ll usually hit plasterboard over timber studs, masonry, or a concrete slab, so choose fixings that won’t wobble or split.
Aim for neat, black powder-coated brackets if you want decorative accents without visual clutter, and pick robust fasteners so your divider stays rigid for privacy enhancements.
- Stud finder, level, and laser line for accurate set-out
- Heavy-duty plasterboard anchors for non-structural sections
- Coach screws or structural wood screws into studs
- Masonry screws plus plugs for brick or block walls
- Angle brackets, floor plates, and cover caps for a clean finish
Measure for a Tight Floor-to-Ceiling Fit
Start by measuring your floor-to-ceiling height in several spots, not just one, because most UK homes aren’t perfectly level. Note any dips or high points and set your slat length to suit the tightest measurement so the divider reads crisp and built-in.
Then allow a few millimetres of installation clearance for positioning and fixings, so you can tap everything into place without forcing it.
Verify Floor-To-Ceiling Height
Before you cut a single slat, you’ll want to verify the true floor-to-ceiling height so the divider sits snug and looks properly built-in. Grab a quality tape and note the floor height and ceiling clearance at your install line; accuracy here makes the whole feature feel architect-designed rather than DIY.
- Mark the divider centreline with low-tack tape.
- Measure vertically with the tape locked, not freehand.
- Record readings in millimetres for cleaner maths.
- Check against your cut list and hardware allowances.
- Confirm you’ve got enough ceiling clearance for fitting and finishing.
If you’re using adjustable feet or a top channel, factor their stated dimensions now, then set your target finished height. You’ll cut with confidence and avoid awkward gaps later.
Account For Variations
Even with your headline floor-to-ceiling height noted, you can’t assume the slab and ceiling run perfectly level across the divider line. In UK homes, especially Victorian conversions and new-builds with services, you’ll often see millimetre dips and crowns that throw a tight slatted divider out of square.
Run a laser level or taut chalk line along the full run, then take readings at regular intervals (every 300–400mm). Record the highest floor point and the lowest ceiling point, and map the spread so you know where your tightest dimension sits.
If the variation’s noticeable, plan your slat lengths accordingly so the rhythm stays consistent and your design aesthetics remain sharp. Getting this right also reduces rework and waste, improving environmental impact.
Allow Installation Clearance
How do you get that crisp, floor-to-ceiling look without fighting the last few millimetres on install day? You build in smart clearance. Measure your floor-to-ceiling height in at least three spots, then cut your slats fractionally short so they’ll slot in cleanly before you wedge and fix.
In UK homes, plaster, floor finishes, and ceilings rarely run true, so aim for a neat shadow gap you can disguise with trims or top/bottom channels—still sleek, still modern, and kinder on your paintwork.
- Take three height readings across the run
- Subtract 5–10mm for install clearance
- Use packers to level and tighten the fit
- Hide gaps with decorative accents (caps, trims)
- Keep privacy considerations in mind when spacing slats
Build Top/Bottom Rails and Slat Guides
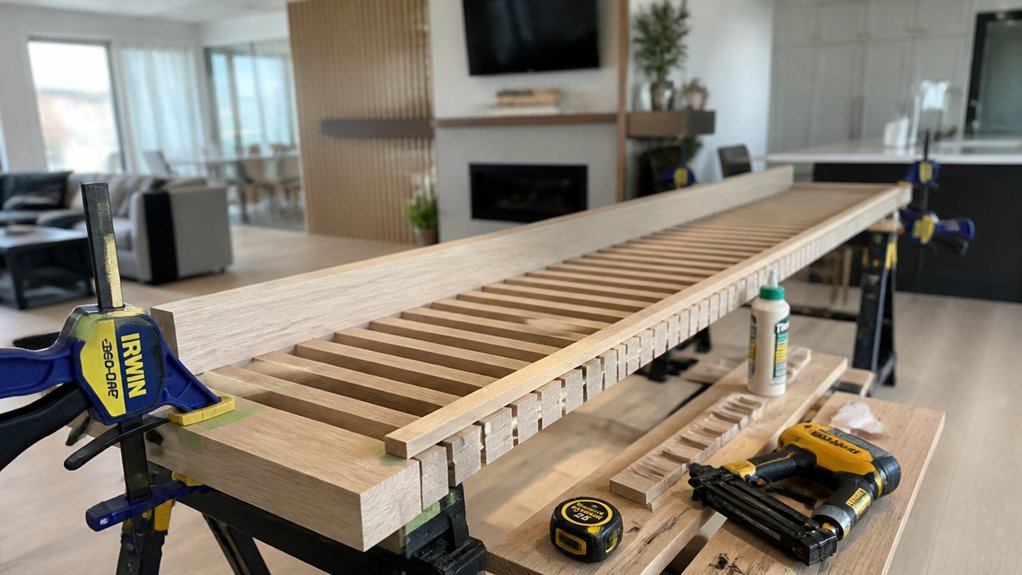
Once you’ve finalised the divider’s overall height and width, you can build the top and bottom rails that keep everything straight and give the slats a crisp, architectural look. Cut matching rails from planed timber or moisture‑resistant MDF, ensuring square ends and consistent thickness for design aesthetics and material durability.
Mark a centreline, then lay out slat positions with a story stick so spacing stays identical.
Next, make slat guides: rout shallow stopped grooves, or fix slim batten strips to create channels. Dry‑fit a few slats to confirm the reveal looks modern and balanced in UK proportions—often 30–45mm gaps.
Pre‑drill and countersink screw holes, keeping fixings hidden on the rear faces. Sand edges to 180 grit so paint or oil finishes cleanly.
Install and Anchor the Slatted Wood Divider Safely
Before you stand the divider up, decide exactly where it’ll land and what you’re anchoring into—joists, concrete slab, or a stud wall—because the fixings you choose determine both safety and that clean, “floating slats” look. Mark the centreline, dry-fit the frame, then plumb it with a spirit level before drilling.
Use proper safety precautions: goggles, ear defenders, and a cable/pipe detector on UK stud walls.
Choose anchoring techniques that match the substrate and load, and don’t rely on plasterboard alone.
Tighten fixings progressively so the rails don’t twist, then re-check plumb and spacing.
- Locate joists/studs with a detector
- Pre-drill to prevent splitting
- Use masonry anchors for slabs
- Use coach screws into timber
- Add discreet L-brackets where hidden
Finish and Upgrade: Sanding, Color, Trim, Lighting, Shelves
After you’ve got the divider solidly anchored, you can lift it from “site-made” to properly modern by refining the timber and adding the upgrades that suit your room.
Start with 120–180 grit, then 240 for a tactile, Scandi-smooth finish; break sharp edges to stop splintering.
Choose Finishing techniques that match UK trends: clear matt lacquer for pale oak, or a hardwax oil to warm walnut tones and keep grain visible.
If you’re painting, use a stain-blocking primer and a durable eggshell.
Add a slim shadow-gap trim at floor and ceiling for a crisp architectural line.
For lighting options, hide an LED strip in a routed rear channel, diffused to avoid hotspots.
Clip in floating shelves between slats for keys, books, or plants.
Conclusion
With your layout nailed down and your slats cut for a snug floor-to-ceiling fit, you’ve turned an open-plan area into a sharper, more flexible space. Keep your spacing consistent, anchor the frame properly, and check plumb as you go—measure twice, cut once. After a careful sand and a matte oil or lacquer, add slim trims, warm LED strips, or a perch shelf for a current UK look that’ll last.
About the Author